
Arduino-Wattmeter
يحتاج المهندس الالكتروني عداد ومقياس لتحليل عمل الدارة ، ومعظم هذه العدادات متوفره بسهوله ويمكن شراؤها بناء على المعاير التي سيتم قياسها ولكن في بعض المشاريع نحتاج لصنع عداد خاص بنا على سبيل المثال أنك تعمل على مشروع الطاقة الشمسية الكهروضوئية وترغب في حساب استهلاك الطاقة من التحميل الخاص بك ، في مثل هذه السيناريوهات يمكننا بناء واتميتر الخاصة بنا باستخدام منصة متحكم بسيطة مثل اردوينو
بناء العدادا الخاصة بك ليس فقط لخفض تكلفة المشروع ، ولكن أيضا يعطينا مجالا لتسهيل عملية الاختبار. على سبيل المثال ، يمكن بسهولة تعديل مقياس واتميترالذي تم إنشاؤه باستخدام اردوينو لمراقبة النتائج على الشاشة التسلسلية ورسم رسم بياني على الراسم التسلسلي أو إضافة بطاقة اس دي لتسجيل قيم الجهد والتيار والطاقة تلقائيًا في فترات زمنية محددة مسبقًا.
الادوات المستخدمة :
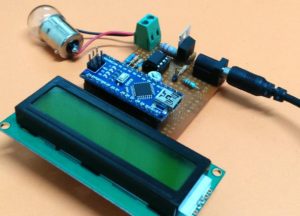
- Arduino Nano
- LM358 Op-Amp
- 7805 Voltage regulator
- 16*2 LCD display
- 0.22 ohm 2Watt shunt resistor
- 10k Trimmer pot
- 10k,20k,2.2k,1k Resistors
- 0.1uF Capacitors
- Test Load
- Perf board or breadboard
- Soldering kit (optional)

Arduino-Wattmeter-Circuit-Diagram
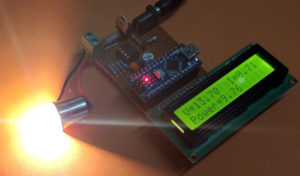
Arduino-Wattmeter-in-action
[sourcecode]/*
* Wattmeter for Solar PV using Arduino
* Dated: 27-7-2018
* Website: <a href="http://www.circuitdigest.com/">www.circuitdigest.com</a>
*
* Power LCD and circuitry from the +5V pin of Arduino whcih is powered via 7805
* LCD RS -> pin 2
* LCD EN -> pin 3
* LCD D4 -> pin 8
* LCD D5 -> pin 9
* LCD D6 -> pin 10
* LCD D7 -> pin 11
* Potetnital divider to measure voltage -> A3
* Op-Amp output to measure current -> A4
*/
#include <LiquidCrystal.h> //Default Arduino LCD Librarey is included
int Read_Voltage = A3;
int Read_Current = A4;
const int rs = 3, en = 4, d4 = 8, d5 = 9, d6 = 10, d7 = 11; //Mention the pin number for LCD connection
LiquidCrystal lcd(rs, en, d4, d5, d6, d7);
void setup() {
lcd.begin(16, 2); //Initialise 16*2 LCD
lcd.print(" Arduino Wattmeter"); //Intro Message line 1
lcd.setCursor(0, 1);
lcd.print(" With Arduino "); //Intro Message line 2
delay(2000);
lcd.clear();
}
void loop() {
float Voltage_Value = analogRead(Read_Voltage);
float Current_Value = analogRead(Read_Current);
Voltage_Value = Voltage_Value * (5.0/1023.0) * 6.46;
Current_Value = Current_Value * (5.0/1023.0) * 0.239;
lcd.setCursor(0, 0);
lcd.print("V="); lcd.print(Voltage_Value);
lcd.print(" ");
lcd.print("I=");lcd.print(Current_Value);
float Power_Value = Voltage_Value * Current_Value;
lcd.setCursor(0, 1);
lcd.print("Power="); lcd.print(Power_Value);
delay(200);
}[/sourcecode]


Leave A Comment